jQuery is most popular library to handle the client side events like form submit, click, change etc. In this article we will learn to submit the form using jQuery Ajax method. Ajax is mostly used when we do not want to reload the page and real time interaction. In this example we will learn Ajax form validation and form submit of post.
Let’s begin the tutorial of submit form using jquery in simple steps:
Step 1: Create Laravel project
First step is to create the Laravel 8 project using composer command or you can also read the How to install laravel 8 ? and Laravel artisan command to generate controllers, Model, Components and Migrations
composer create-project laravel/laravel example-appStep 2: Create controller
Now, create the controller and add the necessary imports and class. You can create by Laravel artisan or manually.
php artisan make:controller PostController<?php
namespace App\Http\Controllers;
use Illuminate\Http\Request;
use Illuminate\Support\Facades\Validator;
use App\Models\Post;
use Illuminate\Support\Facades\Storage;
class PostController extends Controller
{
/**
* Show the form to create a new blog post.
*
* @return \Illuminate\View\View
*/
public function create()
{
return view('post.create');
}
/**
* Store a new blog post.
*
* @param \Illuminate\Http\Request $request
* @return \Illuminate\Http\Response
*/
public function store(Request $request)
{
$validator = Validator::make($request->all(), [
'title' => 'required', // required validation
'description' => 'required',
'picture' => ['required','image','mimes:jpeg,png,jpg,gif,svg','max:2048'],
]); // create the validations
if ($validator->fails()) //check all validations are fine, if not then redirect and show error messages
{
return response()->json($validator->errors(),422);
// validation failed redirect back to form
}
else
{
//handle the form
$post=new Post();
$post->title=$request->get("title");
$post->description=$request->get("description");
$post->picture_name=$request->file("picture")->getClientOriginalName();
$post->picture=$request->file("picture")->store("public/profile");
$post->save();
// Don't forget to create symbolic link using php artisan storage:link
$post->picture= url(Storage::url($post->picture));
return response()->json(["status"=>true,"msg"=>"Post submitted successfully","post"=>$post]);
}
}
}
Here , we added two methods one for to show the form view(create) and store to handle the form submit and validation.
Next, we created a object of model Post then saved file in to storage using $request->file("picture")->store("public/profile") and create a symbolic link using php artisan storage:link.
Then, we response back with json output.
Step 3: Create blade file for view
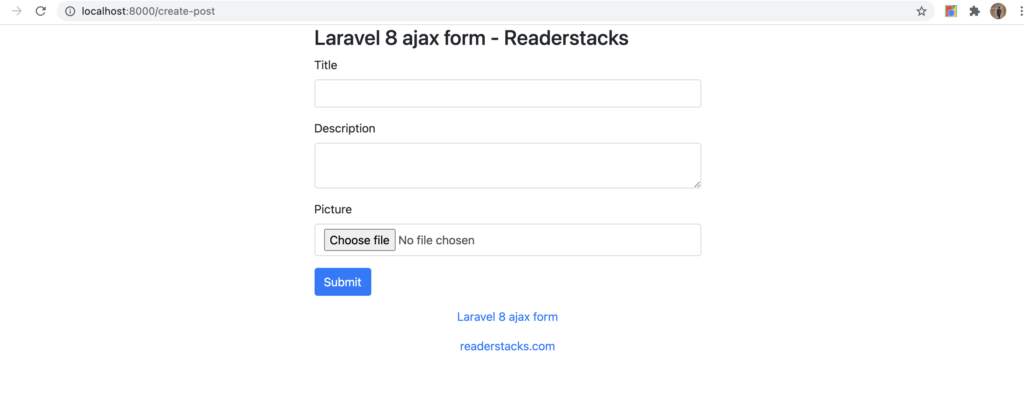
Now it’s time to show the form and validation message to our view, so let’s create the view file.
<div class="container">
    <!-- main app container -->
    <div class="readersack">
      <div class="container">
        <div class="row">
          <div class="col-md-6 offset-md-3">
            <h3>Laravel 8 ajax form - Readerstacks</h3>
            <div class='alert alert-success' style='display:none' id="suc_msg"></div>
            <form method="post" id="handleAjax" action="{{url('submit-post')}}" name="postform">
              <div class="form-group">
                <label>Title</label>
                <input type="text" name="title" class="form-control" />
                @csrf
              </div>
              <div class="form-group">
                <label>Description</label>
                <textarea name="description" class=" form-control"></textarea>

              </div>
              <div class="form-group">
                <label>Picture</label>
                <input type="file" name="picture" class="form-control" />

              </div>
              <div class="form-group">
                <button type="submit" class="btn btn-primary">Submit</button>
              </div>
            </form>
          </div>
        </div>
      </div>
    </div>
    <!-- credits -->
    <div class="text-center">
      <p>
        <a href="#" target="_top">Laravel 8 ajax form </a>
      </p>
      <p>
        <a href="https://readerstacks.com" target="_top">readerstacks.com</a>
      </p>
    </div>
  </div>
Step 4: Add jQuery to handle the form submit
Here is the main logic to handle the form submit using jquery. In this step we will handle form submit using the query post method.
  <script>
    $(function() {
      $("#handleAjax").on("submit", function(e) { //id of form
        e.preventDefault();
        var action = $(this).attr("action"); //get submit action from form
        var method = $(this).attr("method"); // get submit method
        var form_data = new FormData($(this)[0]); // convert form into formdata
        var form = $(this);
        $.ajax({
          url: action,
          dataType: 'json', // what to expect back from the server
          cache: false,
          contentType: false,
          processData: false,
          data: form_data,
          type: method,

          success: function(response) {
            if (response.status) {
              $(".alert-danger").remove();
              form.trigger("reset");
              $("#suc_msg").show();
              var data = `${response.msg}
                                <div>id : ${response.post.id} <br>
                                title :   ${response.post.title} <br>
                                Image : <img src='${response.post.picture}' width=100 /> <br></div>`;
              $("#suc_msg").html(data);

            }
            // display success response from the server
          },
          error: function(response) { // handle the error
            $(".alert-danger").remove();
            try {
              var erroJson = JSON.parse(response.responseText);
              for (var err in erroJson) {
                for (var errstr of erroJson[err])
                  $("[name='" + err + "']").after("<div class='alert alert-danger'>" + errstr + "</div>");
              }
              if (options.error) {
                options.error(response);
              }
            } catch (err) {

            }

          },

        })
      });

    });


  </script>
Here, we added ("#handleAjax").on("submit", function() {} to handle the submit event of form. Then, create a post request using $.post and also get the value of form action.
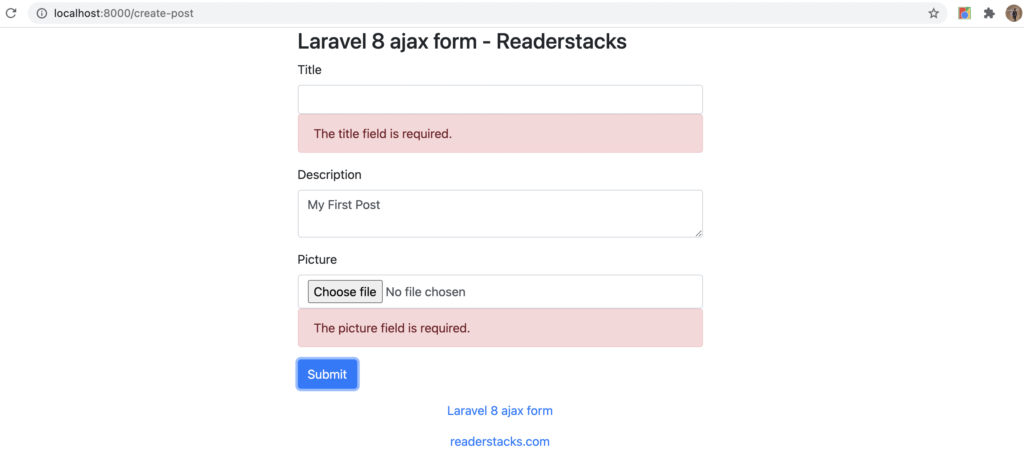
We are also rendering the submitted post with success message you can check screenshots.
Step 5: Create routes
Now, open the routes/web.php and add below routes
<?php

use Illuminate\Support\Facades\Route;
use \App\Http\Controllers\PostController;


Route::get('/create-post',[PostController::class, 'create']);
Route::post('/submit-post',[PostController::class, 'store']);
Screenshots


