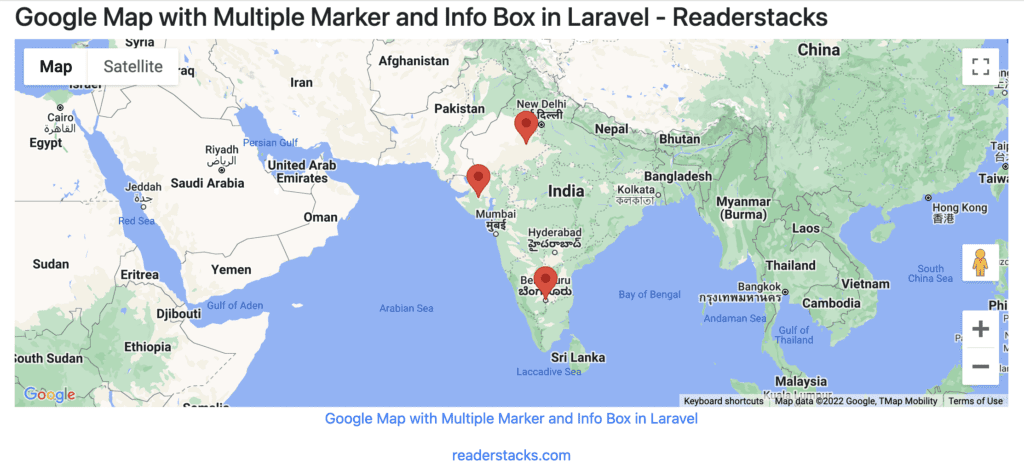
In this article we will learn to integrate google map with multiple marker and info box in laravel. Google maps are used to navigate the user location or indicate the location of business and any user. Sometimes In our application we want to show the multiple location with some information on map like to show nearby businesses, hotels, places etc. so in that case google maps are most optimal way to use map and marker. we will also learn to auto center the map while there is multiple marker in map.
There is many use cases of google maps with multiple marker and info box like show hotel price with info box , contact numbers, show near by places etc. and each has their own specif requirement to use in application.
In this tutorial we will use a simple example in which we show the google map and a marker of location is using latitude and longitude. this example will work in all versions of laravel including laravel 5, laravel 6, laravel 7, laravel 8 and laravel 9 too.
PREVIEW:

Let’s start the tutorial of integrate Google Map with Multiple Marker and Info Box in Laravel step by step
Step 1: Create a laravel project
First step is to create the Laravel project using composer command or you can also read the How to install laravel 8 ? and Laravel artisan command to generate controllers, Model, Components and Migrations
Step 2: Configure google map
Now configure the google map by creating the account on google developer account and get keys for map by following below steps
- Go to the Google Maps Platform > Credentials page.
- Go to the Credentials page
- On the Credentials page, click Create credentials > API key.
The API key created dialog displays your newly created API key. - Click Close.
The new API key is listed on the Credentials page under API keys.
and then add it in environment file .env
GOOGLE_MAPS_API_KEY=KEY_HEREStep 3: Create Controller
Next, Create the a controller and add the necessary imports and class. You can create by Laravel artisan or manually.
php artisan make:controller MapController Now, add the lat longs and pass it to view
    <?php

    namespace App\Http\Controllers;

    use App\Models\Article;
    use App\Models\User;
    use Illuminate\Http\Request;

    class MapController extends Controller
    {


        public function showMap(Request $request)
        {

          $locations = [
            ["lat" => 12.9716, "lng" => 77.5946],
            ["lat" => 26.9124, "lng" => 75.7873],
            ["lat" => 22.2587, "lng" => 71.1924],
          ];
          return view("show-map",['locations'=>$locations]);
        }
}
Step 4: Create View Files
Create a view file as we used in controller so create show-map.blade.php and add follow code
<!DOCTYPE html>
<html lang="{{ str_replace('_', '-', app()->getLocale()) }}">

<head>
    <meta charset="utf-8">
    <meta name="viewport" content="width=device-width, initial-scale=1">

    <title>Google Map with Multiple Marker and Info Box in Laravel - Readerstacks </title>

    <script src="https://code.jquery.com/jquery-3.6.0.min.js" crossorigin="anonymous"></script>
    <script type="text/javascript" src="https://cdnjs.cloudflare.com/ajax/libs/jquery-validate/1.19.1/jquery.validate.min.js"></script>
    <link href="//netdna.bootstrapcdn.com/bootstrap/4.1.1/css/bootstrap.min.css" rel="stylesheet" />

</head>

<body class="antialiased">
    <div class="container">
        <!-- main app container -->
        <div class="readersack">
            <div class="container">
                <div class="row">
                    <div class="col-md-12 ">
                        <h3>Google Map with Multiple Marker and Info Box in Laravel - Readerstacks</h3>
                        <div id="map" style='height:400px'></div>

                    </div>
                </div>
            </div>
        </div>
        <!-- credits -->
        <div class="text-center">
            <p>
                <a href="#" target="_top">Google Map with Multiple Marker and Info Box in Laravel
                </a>
            </p>
            <p>
                <a href="https://readerstacks.com" target="_top">readerstacks.com</a>
            </p>
        </div>
    </div>

</body>
<script type="text/javascript">
    function initializeMap() {
        const locations = <?php echo json_encode($locations) ?>;

        const map = new google.maps.Map(document.getElementById("map"));
        var infowindow = new google.maps.InfoWindow();
        var bounds = new google.maps.LatLngBounds();
        for (var location of locations) {
            var marker = new google.maps.Marker({
                position: new google.maps.LatLng(location.lat, location.lng),
                map: map
            });
            bounds.extend(marker.position);
            google.maps.event.addListener(marker, 'click', (function(marker, location) {
                return function() {
                    infowindow.setContent(location.lat + " & " + location.lng);
                    infowindow.open(map, marker);
                }
            })(marker, location));

        }
        map.fitBounds(bounds);
    }
</script>

<script type="text/javascript" src="https://maps.google.com/maps/api/js?key={{ env('GOOGLE_MAPS_API_KEY') }}&callback=initializeMap"></script>


</html>
main logic to add map is javascript which is here
 function initializeMap() {
        const locations = <?php echo json_encode($locations) ?>;

        const map = new google.maps.Map(document.getElementById("map"));
        var infowindow = new google.maps.InfoWindow();
        var bounds = new google.maps.LatLngBounds();
        for (var location of locations) {
            var marker = new google.maps.Marker({
                position: new google.maps.LatLng(location.lat, location.lng),
                map: map
            });
            bounds.extend(marker.position);
            google.maps.event.addListener(marker, 'click', (function(marker, location) {
                return function() {
                    infowindow.setContent(location.lat + " & " + location.lng);
                    infowindow.open(map, marker);
                }
            })(marker, location));

        }
        map.fitBounds(bounds);
    }
here we also added the auto center code so according to marker it will auto center the map
Step 5: Create the route
Final step is to create the route as follow
<?php

use Illuminate\Support\Facades\Route;

/*
|--------------------------------------------------------------------------
| Web Routes
|--------------------------------------------------------------------------
|
| Here is where you can register web routes for your application. These
| routes are loaded by the RouteServiceProvider within a group which
| contains the "web" middleware group. Now create something great!
|
*/
Route::get('/show-map', "\App\Http\Controllers\ArticleController@showMap" );


