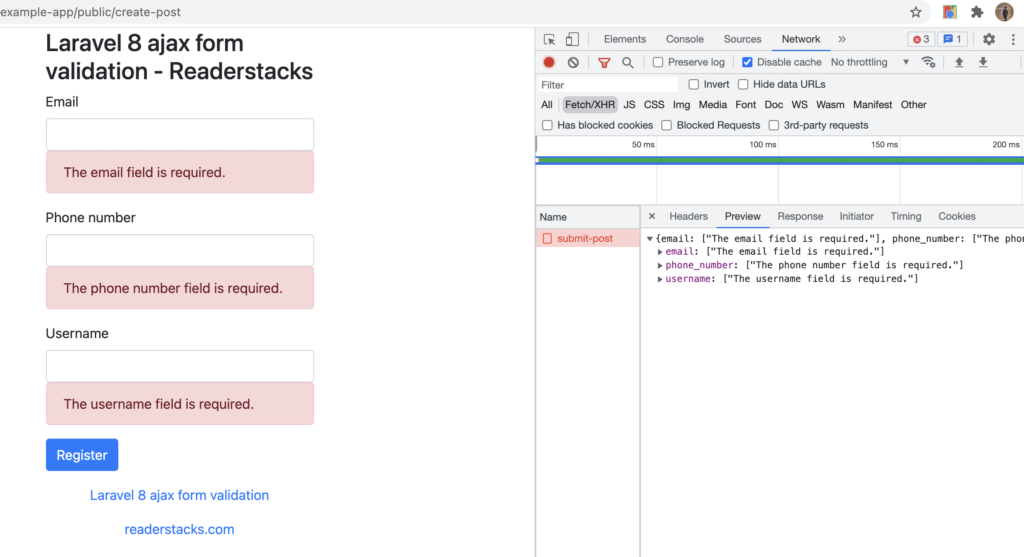
In this article, I will demonstrate to show Laravel server side validation using Ajax. We will use jQuery to show the validation and submit the form. Using the jQuery and AJAX we will prevent the page reloading and show the validation. In this article, we will use the same simple form and controller but the only thing we need to change is the response method which will be JSON.
Also read Laravel 8 form validation with example.
Let’s begin the tutorial of Laravel Ajax Form Validation Online in simple steps:
Step 1: Create Laravel project
First step is to create the Laravel 8 project using composer command or you can also read the How to install laravel 8 ? and Laravel artisan command to generate controllers, Model, Components and Migrations
composer create-project laravel/laravel example-appStep 2: Create controller
Now, create the controller and add the necessary imports and class. You can create by Laravel artisan or manually.
php artisan make:controller PostController<?php
namespace App\Http\Controllers;
use Illuminate\Http\Request;
use Illuminate\Support\Facades\Validator;
class PostController extends Controller
{
/**
* Show the form to create a new blog post.
*
* @return \Illuminate\View\View
*/
public function create()
{
return view('post.create');
}
/**
* Store a new blog post.
*
* @param \Illuminate\Http\Request $request
* @return \Illuminate\Http\Response
*/
public function store(Request $request)
{
$validator = Validator::make($request->all(), [
'email' => 'required|email', // required and email format validation
'phone_number' => 'required|numeric|digits_between:9,15', // required and number field validation
'username' => ['required'],
]); // create the validations
if ($validator->fails()) //check all validations are fine, if not then redirect and show error messages
{
return response()->json($validator->errors(),422);
//return back()->withInput()->withErrors($validator);
// validation failed return the json
}
else
{
return response()->json(["status"=>true,"message"=>"Form submitted successfully"]);
}
}
}
Here , we added two methods one for to show the form view(create) and store to handle the form submit and validation.
Next, we have added validation for email, phone number and username. Email is required and should be format of email. Then, phone number should be required, numeric , digit_between 9 to 15.
Step 3: Create blade file for view
Now it’s time to show the form and validation message to our view, so let’s create the view file.
 <h3>Laravel 8 custom form validation - Readerstacks</h3>

            <form method="post" id="validateajax" action="{{url('submit-post')}}" name="registerform">
              <div class="form-group">
                <label>Email</label>
                <input type="text" name="email" value="{{ old('email') }}" class="@error('email') is-invalid @enderror form-control" />

                @error('email')
                <div class="alert alert-danger">{{ $message }}</div>
                @enderror
                @csrf
              </div>
              <div class="form-group">
                <label>Phone number</label>
                <input type="text" name="phone_number" value="{{ old('phone_number') }}" class="@error('phone_number') is-invalid @enderror form-control" />
                @error('phone_number')
                <div class="alert alert-danger">{{ $message }}</div>
                @enderror
              </div>
              <div class="form-group">
                <label>Username</label>
                <input type="text" name="username" value="{{ old('username') }}" class="@error('username') is-invalid @enderror form-control" />
                @error('username')
                <div class="alert alert-danger">{{ $message }}</div>
                @enderror
              </div>

              <div class="form-group">
                <button class="btn btn-primary">Register</button>
              </div>
            </form>
Step 4: Add jQuery to handle the form submit
Here is the main logic to handle the form submit using jquery. In this step we will handle form submit using the query post method.
  <script>
    $(function() {
      ("#validateajax").on("submit", function() {

          var action = $(this).attr("action");
          var method = $(this).attr("method");
          if (method == "post") {
            $.post(action, $(this).serialize(), function(data) {
              alert("Form submitted successfully")
            }).fail(function(response) {
              $(".alert").remove();
              var erroJson = JSON.parse(response.responseText);
              for (var err in erroJson) {
                for (var errstr of erroJson[err])
                  $("[name='" + err + "']").after("<div class='alert alert-danger'>" + errstr + "</div>");
              }

            });;
          }
          return false;

        });
    });


  </script>
Here, we added ("#validateajax").on("submit", function() {} to handle the submit event of form. Then, create a post request using $.post and also get the value of form action.
In next line we are handling the fail and success state. if the AJAX failed then it come into the fail block (Http response code 422). if the response code is 200 then it will come into success block.
              $(".alert").remove();
              var erroJson = JSON.parse(response.responseText);
              for (var err in erroJson) {
                for (var errstr of erroJson[err])
                  $("[name='" + err + "']").after("<div class='alert alert-danger'>" + errstr + "</div>");
              }
Above code we are using to show the validation message below the each field.
Step 5: Create routes
Now, open the routes/web.php and add below routes
<?php

use Illuminate\Support\Facades\Route;
use \App\Http\Controllers\PostController;
use \App\Http\Controllers\QRController;

/*
|--------------------------------------------------------------------------
| Web Routes
|--------------------------------------------------------------------------
|
| Here is where you can register web routes for your application. These
| routes are loaded by the RouteServiceProvider within a group which
| contains the "web" middleware group. Now create something great!
|
*/

Route::get('/create-post',[PostController::class, 'create']);
Route::post('/submit-post',[PostController::class, 'store']);
Laravel 8 ajax form validation


