In this blog post, we’ll explore how to upload image using Laravel 11. Laravel 11 provides robust functionality for uploading and processing images, which is essential for various website tasks, from setting up profile pictures to handling document uploads. With Laravel 11, you can manage image uploads securely.
Laravel utilizes the Request file method to access and handle uploaded files. It offers various methods for storing and validating uploaded files. Moreover, Laravel supports uploading images to cloud servers such as AWS.
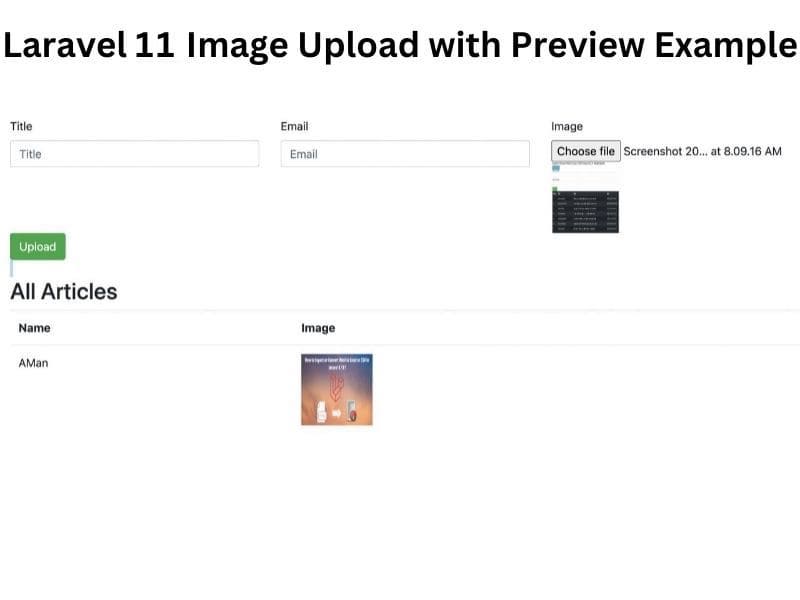
Given Laravel’s extensive features and packages, this tutorial will focus on leveraging Laravel’s built-in methods for image uploading. Specifically, we’ll create routes, a controller, a model, a view, and a JavaScript file to enable image preview.
Prerequisites for Laravel Image Upload with Preview Example
Before starting the tutorial, ensure you have the following prerequisites:
- Basic understanding of Laravel and PHP.
- Laravel 11 installed on your system.
- A Laravel project set up.
- A functional database connection.
To begin with the Laravel 11 Image Upload with Preview Example, follow these step-by-step instructions.
Step 1: Create a fresh laravel project
Open a terminal window and type below command to create a new project
composer create-project --prefer-dist laravel/laravel blogYou can also read this to start with new project and create database connection
Step 2 : Create a table and model
Now, for an example i am creating here a table using migration and then i am going to fill the data in it, so create model and migration
php artisan make:model Article -mthis will generate the model and migration file
<?php

namespace App\Models;

use Illuminate\Database\Eloquent\Factories\HasFactory;
use Illuminate\Database\Eloquent\Model;

class Article extends Model
{
    use HasFactory;

}
and migration file database/migrations/timestamp_create_articles_table.php
<?php

use Illuminate\Database\Migrations\Migration;
use Illuminate\Database\Schema\Blueprint;
use Illuminate\Support\Facades\Schema;

return class extends Migration
{
    /**
     * Run the migrations.
     *
     * @return void
     */
     public function up()
    {
        Schema::create('articles', function (Blueprint $table) {
            $table->id();
            $table->string('email')->unique();;
            $table->string('title');
            $table->string('body')->nullable();
            $table->string('image');
            $table->timestamps();
        });
    }

    /**
     * Reverse the migrations.
     *
     * @return void
     */
    public function down()
    {
        Schema::dropIfExists('articles');
    }
}
and then migrate the migration
php artisan migrateStep 3 : Create controller
Let’s create a controller and add a methods showArticle and addArticle
php artisan make:controller ArticleControllerand add the below code
<?php

namespace App\Http\Controllers;

use Illuminate\Http\Request;
use App\Models\Article;
use Illuminate\Support\Facades\Validator;

class ArticleController extends Controller
{
    public function showArticle(Request $request){

        $articles = Article::all();
        return view('articles.article',['articles'=>$articles]);
     }

     function addArticle(Request $request){

        $validator = Validator::make($request->all(),[
                        'title' => "required",
                        'email' => "required|email",
                        'image' => 'required|image|mimes:jpeg,png,jpg,gif,svg|max:4096',
                    ]);
        if ($validator->fails())
        {
            return redirect()->back()->withInput()->withErrors($validator->errors());
        }


         //  save image and name in database
           $Article=new Article();
           $Article->title=$request->title;
           $Article->email=$request->email;
           $file = $request->file("image")->store("public/articles");
           $Article->image = str_replace("public/","storage/",$file);
           $Article->save();
           return back()
             ->with('success','You have successfully created the article with image.');

     }
}
Now run artisan command to run Symblink
php artisan storage:linkStep 4 : Create View File
Now, show the upload form in view file and also show the list of compressed images
resources/views/articles/article.blade.php
<!DOCTYPE html>
<html>

<head>
    <title> Laravel 11 Image Upload with Preview Example - readerstacks.com</title>
    <link rel="stylesheet" href="https://maxcdn.bootstrapcdn.com/bootstrap/4.0.0/css/bootstrap.min.css">
</head>

<body>
    <div class="container">

        <div class="panel panel-primary">
            <div class="panel-heading">
                <h2> Laravel 11 Image Upload with Preview Example -readerstacks.com</h2>
            </div>
            <div class="panel-body">

                @if ($message = Session::get('success'))
                <div class="alert alert-success alert-block">
                    <button type="button" class="close" data-dismiss="alert">×</button>
                    <strong>{{ $message }}</strong>
                </div>

                @endif
                <br><br>
                <form action="{{ url('add-article') }}" method="POST" enctype="multipart/form-data">
                    @csrf
                    <div class="row">

                        <div class="col-md-4">
                            <label>Title</label>
                            <input type="text" placeholder="Title" name="title" class="form-control">
                        </div>
                        <div class="col-md-4">
                            <label>Email</label>
                            <input type="email" placeholder="Email" name="email" class="form-control">
                        </div>
                        <div class="col-md-4">
                            <label>Image</label>
                             <input type="file" placeholder="Image" name="image" id="imgInp">
                              <img style="visibility:hidden"  id="prview" src=""  width=100 height=100 />

                    </div>
                     </div>
                    <div class="row">


                        <div class="col-md-6">
                            <button type="submit" class="btn btn-success">Upload</button>
                        </div>

                    </div>
                </form>
                <br>
                <h2>All Articles</h2>
                <table class="table">
                    <tr>
                        <th>Name</th>
                        <th>Image</th>

                    </tr>
                    @foreach( $articles as $article)
                    <tr>
                        <td>{{$article->title}}</td>
                        <td>
                             <!-- in case of you are putting index.php in root folder -->
                             <!-- <img height="100" width=100 src="{{url($article->image)}}" /> -->
                            <img height="100" width=100 src="{{url($article->image)}}" />
                        </td>
                    </tr>
                    @endforeach
                </table>
            </div>
        </div>
    </div>
</body>
<script>
imgInp.onchange = evt => {
  const [file] = imgInp.files
  if (file) {
    prview.style.visibility = 'visible';

    prview.src = URL.createObjectURL(file)
  }
}
</script>
</html>
here we used {{url($article->image)}} to render the image in web page.
Step 4: Create two routes in routes/web.php
One route for preview the html and another route for upload and compress the image.
routes/web.php
<?php

use App\Http\Controllers\ArticleController;
use Illuminate\Support\Facades\Route;


Route::get('/articles',[ArticleController::class,"showArticle"]);
Route::post('/add-article',[ArticleController::class,"addArticle"]);
Results Screenshot:

I hope it will help you to implement form image uploading. you can also read article How to create multiple size thumbs from image in laravel 8 ? and upload image in angular php.


