Google login or signup in laravel are demanding from start as it gives user to access the website in single click. Google is widely used social media platform therefore most of the users are on it and we can take leverage of it by providing the feature of login and signup through Google.
Google itself provides SDK and rest apis to implement Google login and when it comes to laravel, laravel also provide a package named as socialite. Socialite package also provides to implement many other websites like Google, github, twitter etc. but in this article we will cover the Google login or signup integration. here is the list socialite provides auth
facebooktwitter(OAuth 1.0)twitter-oauth-2(OAuth 2.0)linkedingooglegithubgitlabbitbucket
Socialite enhance the user experience through providing single click login and signup authentication and user can access the full features of application without any long steps of verification and signup.

Let’s implement it with example
Step 1 : Install the package
I assume the you have already installed the laravel and basic connection of it like database connection and composer.
Now install the package using composer in laravel root directory, open the terminal in laravel root directory and run below command
composer require laravel/socialiteAnd then run composer update
composer updateStep 2 : Add Service provider and alias
Most of the packages comes with laravel package discovery enabled and automatic add service provider to packages built after laravel 5.5 so if your laravel version is greater then 5.5 then you can skip this step.
Search for providers key and Add service provider in config\app.php
'providers' => [
        // ...
        Laravel\Socialite\SocialiteServiceProvider::class,
    ]
Also find alias key and add as below
aliases' => [
        // ...
        'Socialite' => Laravel\Socialite\Facades\Socialite::class,
    ]
Step 3 : Add config in config/services.php
We need to define the credentials like client secret and client id in our services file so that we can configure the login setup.
Add google details as below in the array
<?php

return [


    'mailgun' => [
        'domain' => env('MAILGUN_DOMAIN'),
        'secret' => env('MAILGUN_SECRET'),
        'endpoint' => env('MAILGUN_ENDPOINT', 'api.mailgun.net'),
    ],

     ......
    'google' => [
        'client_id' => env('GOOGLE_CLIENT_ID'),
        'client_secret' => env('GOOGLE_CLIENT_SECRET'),
        'redirect' => 'http://localhost/example-app/public/google/callback',
    ],

];
Here we used env function to get the client id and secret so also define it in .env
....
GOOGLE_CLIENT_ID=1004393507165841
GOOGLE_CLIENT_SECRET=328798728323b238239232
Step 4 : Create client ID and Client secret
This is most important part of this articles since we can’t use Google login without the client id and secret so we need to configure them on Google developer account
First go to https://console.cloud.google.com/apis/dashboard
then you will see form like this
Create a New Project
As you can see in the image select a project or add new project so you can get this popup by clicking on left top side of header.

Create Project
Now, click on Create project and ad ne

Enable services and APIS
Click on enable apis & services and search google api

Search Google+ API
No you will land to API Library search page and enter Google+ api

Enable Google+ API
Enable the api as below

OAuth consent screen
Setup the OAuth consent screen so we can setup the name and basic details, in the next screen you need to select external

Add App Basic Information
Add the basic information and leave app domain empty if localhost otherwise you need domain verification first

Update Scopes Access
Update the scopes as below

Add Test Users
Add your email so we can test the login process

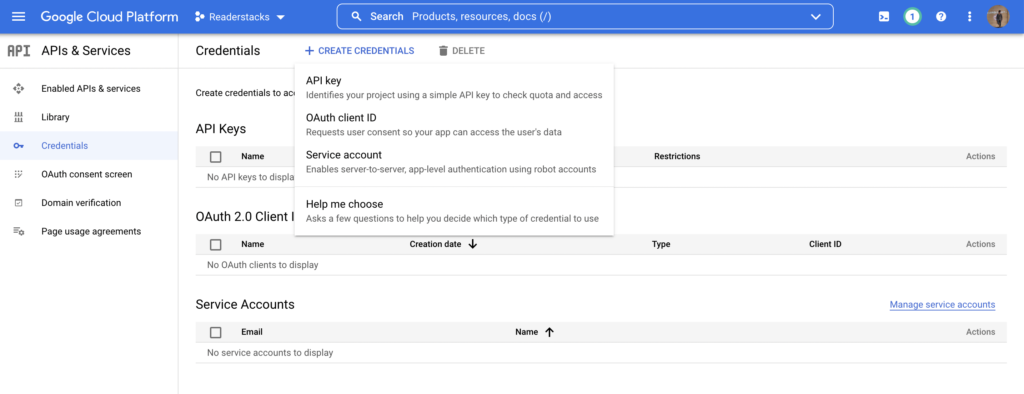
Create Credentials OAuth client ID
Now create API credentials from top button create credentials as shown in image

Add Application Type and Name
Add name and type

Generate OAuth Client ID

Now put the details in .env
....
GOOGLE_CLIENT_ID=1004393507165841
GOOGLE_CLIENT_SECRET=328798728323b238239232
Step 4 : Create routes
Add appropriate routes to connect our URL to controller therefore open routes/web.php and add below routes
<?php
use Illuminate\Support\Facades\Route;
use \App\Http\Controllers\UserController;

Route::get('/auth/login',[UserController::class,"sociallogin"]);
Route::get('/auth/google/redirect',[UserController::class,"redirectToGoogle"]);
Route::get('/google/callback', [UserController::class,"handleGoogleCallback"]);
Here we created one route only that means you can create it anywhere but we are using it only our demo purpose.
Step 4 : Create Controller
Now, create the controller as we have mentioned in routes is PostController and also create three methods create, store and refreshCaptcha so create a file in app\Http\Controllers\PostController.php
<?php

namespace App\Http\Controllers;

class UserController extends Controller
{
    //show the logined user
    public function home(){
        return view("home");
    }
   // show login button view
    public function socialLogin(){
        return view("user.login");
    }

    public function redirectToGoogle(){
        return Socialite::driver('google')->redirect();
    }

    public function handleGoogleCallback(){
        $socialuser = Socialite::driver('google')->user();
        // dd($socialuser->getAvatar());

        $user      =   User::where(['email' => $socialuser->getEmail()])->first();
        if(!$user){
            $user = User::firstOrCreate([
                'name'          => $socialuser->getName(),
                'email'         => $socialuser->getEmail(),
                'image'         => $socialuser->getAvatar(),
                'provider_id'   => $socialuser->getId(),
                'provider_type'   => "GOOGLE",
            ]);
        }

        Auth::login($user);
        return redirect('/home');
    }


}
Here we created three methods home, socialLogin, redirectToFacebook and handleCallback. home is to show the logined user socialLogin method is to show the login button view, redirectToFacebook method on click of button we can redirect it to facebook login authentcation and last handleCallback to handle the repsonse from facebook.
Step 5 : Create view
We have create the controller and now we will create the view to show the button for sharing on social media
<!DOCTYPE html>
<html lang="{{ str_replace('_', '-', app()->getLocale()) }}">

<head>
  <meta charset="utf-8">
  <meta name="viewport" content="width=device-width, initial-scale=1">

  <title>Readerstacks Implement Facebook Login or Signup in laravel 8 / 9 </title>

  <link href="//netdna.bootstrapcdn.com/bootstrap/4.1.1/css/bootstrap.min.css" rel="stylesheet" />
  <link rel="stylesheet" href="https://cdnjs.cloudflare.com/ajax/libs/font-awesome/5.10.1/css/all.min.css" integrity="sha512-9my9Mb2+0YO+I4PUCSwUYO7sEK21Y0STBAiFEYoWtd2VzLEZZ4QARDrZ30hdM1GlioHJ8o8cWQiy8IAb1hy/Hg==" crossorigin="anonymous" referrerpolicy="no-referrer" />
</head>

<body class="antialiased">
  <div class="container">
    <!-- main app container -->
    <div class="readersack">
      <div class="container">
        <div class="row">
          <div class="col-md-6 offset-md-3">
            <h3>  Implement Facebook Login or Signup in laravel 8 / 9 - Readerstacks</h3>

             <a class="btn btn-success" href="{{url('/auth/google/redirect')}}">Login With GOOGLE</a>

          </div>
        </div>
      </div>
    </div>
    <!-- credits -->
    <div class="text-center">
      <p>
        <a href="#" target="_top"> Implement Facebook Login or Signup in laravel 8 / 9 - Readerstacks</a>
      </p>
      <p>
        <a href="https://readerstacks.com" target="_top">readerstacks.com</a>
      </p>
    </div>
  </div>
</body>
</html>
and home
<!DOCTYPE html>
<html lang="{{ str_replace('_', '-', app()->getLocale()) }}">

<head>
  <meta charset="utf-8">
  <meta name="viewport" content="width=device-width, initial-scale=1">

  <title>Readerstacks Implement Facebook Login or Signup in laravel 8 / 9 </title>

  <link href="//netdna.bootstrapcdn.com/bootstrap/4.1.1/css/bootstrap.min.css" rel="stylesheet" />
  <link rel="stylesheet" href="https://cdnjs.cloudflare.com/ajax/libs/font-awesome/5.10.1/css/all.min.css" integrity="sha512-9my9Mb2+0YO+I4PUCSwUYO7sEK21Y0STBAiFEYoWtd2VzLEZZ4QARDrZ30hdM1GlioHJ8o8cWQiy8IAb1hy/Hg==" crossorigin="anonymous" referrerpolicy="no-referrer" />
</head>

<body class="antialiased">
  <div class="container">
    <!-- main app container -->
    <div class="readersack">
      <div class="container">
        <div class="row">
          <div class="col-md-6 offset-md-3">
            <h3>  Implement Facebook Login or Signup in laravel 8 / 9 - Readerstacks</h3>

            @if(\Auth::check())
              <div class='dash'>You are logged in as  : {{\Auth::user()->email}} ,  <a href="{{url('logout')}}"> Logout</a></div>
            @else
            <div class='dash '>
              <div class='error'> You are not logged in  </div>
              <div>  <a href="{{url('login')}}">Login</a> | <a href="{{url('register')}}">Register</a> </div>
            </div>

            @endif

          </div>
        </div>
      </div>
    </div>
    <!-- credits -->
    <div class="text-center">
      <p>
        <a href="#" target="_top"> Implement Facebook Login or Signup in laravel 8 / 9 - Readerstacks</a>
      </p>
      <p>
        <a href="https://readerstacks.com" target="_top">readerstacks.com</a>
      </p>
    </div>
  </div>
</body>


</html>
Here we used Auth to check the login status and show details.


